Simplicityは標準でFacebookページの「いいね」ボタンが実装されてます。
いろんなBlogで見かけるようになったFacebookページの「いいね」ボタンのバイラル風。
今回はそれを実装しましょうってお話です。
これにしてからジワリジワリですが、Facebookページへのいいねも増えてきてます。
では早速行きましょう。

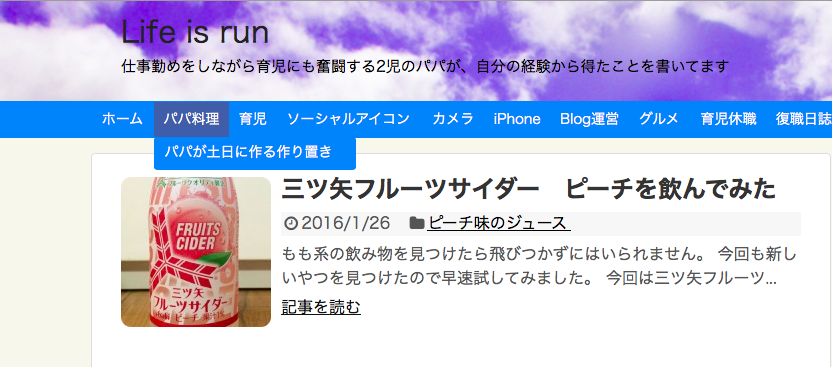
↑こちらは画像なので押しても反応しません。
下に本物があります。
対応方法はこれだ!
僕自身はこれをみて「あ、やりたいな!」って思ったのです。
FacebookページいいねやTwitterフォロワーが倍増!バイラルメディア風オリジナルSNSボタンの設置方法【WordPress】
僕が実装した環境
僕が今回実装した環境はこちらです。
ということで子テーマを使ってやっています。
親テーマだけでもできなくんはないですが、元のテーマを編集することになるので、オススメしないです。
simplicityには元々Facebookページのいいねボタンを表示するphpが「facebook-page-like.php」として用意されています。
こやつを子テーマ用に作ります。
自分のWordpressサーバーのテーマのphpのフォルダに何も記述のない「facebook-page-like.php」を作ります。
それが出来上がったら、こちらのコードを書き込みます。
黄色く反転しているところはご自身の情報を記載して書き換えてくださいね。
<!-- 記事がよかったらいいね ここから -->
<?php if (is_mobile()) :?>
      <div class="p-shareButton p-asideList p-shareButton-bottom">
        <div class="p-shareButton__cont">
          <div class="p-shareButton__a-cont">
            <div class="p-shareButton__a-cont__img" style="background-image: url('<?php echo wp_get_attachment_url( get_post_thumbnail_id($post->ID) ); ?>')"></div>
            <div class="p-shareButton__a-cont__btn">
              <p>この記事が気に入ったらいいね!お願いします!!</p>
              <div class="p-shareButton__fb-cont p-shareButton__fb">
                <div class="fb-like" data-href="自分のFacebookページのURLをいれてください/" data-layout="button_count" data-action="like" data-show-faces="false" data-share="false"></div>
                <span class="p-shareButton__fb-unable"></span>
              </div>
            </div>
          </div>
        </div>
        <div class="p-asideFollowUs__twitter">
          <div class="p-asideFollowUs__twitter__cont">
            <p class="p-asideFollowUs__twitter__item">Twitterで自分のtwitteridを入れてください]をフォローしよう!</p>
            <a href="自分のtwitterのURLを入れてください" class="twitter-follow-button p-asideFollowUs__twitter__item" data-show-count="false" data-size="large" data-show-screen-name="false">Follow 自分のtwitteridを入れてください]</a>
            <script>!function(d,s,id){var js,fjs=d.getElementsByTagName(s)[0],p=/^http:/.test(d.location)?'http':'https';if(!d.getElementById(id)){js=d.createElement(s);js.id=id;js.src=p+'://platform.twitter.com/widgets.js';fjs.parentNode.insertBefore(js,fjs);}}(document, 'script', 'twitter-wjs');</script>
          </div>
        </div>
 </div>
<?php else: ?>
<div style="padding:10px 0px;"></div>
 <!-- 記事がよかったらいいねPC -->
            <div class="p-entry__push">
              <div class="p-entry__pushThumb" style="background-image: url('<?php echo wp_get_attachment_url( get_post_thumbnail_id($post->ID) ); ?>')"></div>
              <div class="p-entry__pushLike">
                <p>この記事が気に入ったら<br>いいね!お願いします!!</p>
                <div class="p-entry__pushButton">
<div class="fb-like" data-href=“自分のFacebookページのURLをいれてください” data-layout="button_count" data-action="like" data-show-faces="false" data-share="false"></div>
                </div>
                <p class="p-entry__note">最新情報をお届けします</p>
              </div>
            </div>
                        <div class="p-entry__tw-follow">
              <div class="p-entry__tw-follow__cont">
                <p class="p-entry__tw-follow__item">Twitterで[自分のtwitteridを入れてください]をフォローしよう!</p>
                <a href=“自分のtwitterのURLを入れてください” class="twitter-follow-button p-entry__tw-follow__item" data-show-count="false" data-size="large" data-show-screen-name="false">Follow [自分のtwitteridを入れてください]</a>
                <script>!function(d,s,id){var js,fjs=d.getElementsByTagName(s)[0],p=/^http:/.test(d.location)?'http':'https';if(!d.getElementById(id)){js=d.createElement(s);js.id=id;js.src=p+'://platform.twitter.com/widgets.js';fjs.parentNode.insertBefore(js,fjs);}}(document, 'script', 'twitter-wjs');</script>
              </div>
</div>
<?php endif; ?>
 <!-- 記事がよかったらいいね ここまで -->
ハイライトしている部分は、自分のFacebookページ、Twitterのアカウントページや、Twitter IDを登録するところです。
これが終わったら今度はcssファイルです。
スタイルシートの次のコードを書き込みます。
/*記事がよかったら、いいねスマホ*/
.p-shareButton-bottom {
    padding-bottom: 15px;
    overflow: hidden;
}
.p-shareButton__buttons {
    font-weight: 700;
    color: #fff;
    font-size: 13px;
    text-align: center;
}
.p-shareButton__buttons>li {
    padding-left: 3px;
    padding-right: 4px;
}
.p-shareButton__buttons .c-btn {
    padding: 8px 0;
    border-radius: 2px;
}
.p-shareButton__buttons .c-ico {
    display: block;
    margin: auto auto 5px;
}
.p-shareButton__fb {
    -webkit-transform: scale(1.2);
    -ms-transform: scale(1.2);
    transform: scale(1.2);
    width: 115px;
}
.p-shareButton__fb-cont {
    position: relative;
    width: 108px;
    margin: 0 auto;
}
.p-shareButton__fb-unable {
    position: absolute;
    top: 0;
    left: 0;
    width: 20px;
    height: 20px;
}
.p-shareButton__cont {
    margin: 15px 0 0;
}
.p-shareButton__a-cont {
    background: #2e2e2e;
    display: table;
    width: 100%;
}
.p-shareButton__a-cont__img {
    display: table-cell;
    min-width: 130px;
    -webkit-background-size: cover;
    background-size: cover;
    background-repeat: no-repeat;
    background-position: center;
}
.p-shareButton__a-cont__btn {
    display: table-cell;
    padding: 12px;
    text-align: center;
}
.p-shareButton__a-cont__btn p {
    font-size: 12px;
    color: #fff;
    font-weight: 700;
    padding: 5px 0 15px;
    line-height: 1.4;
    margin-bottom: 0px;
}
.p-asideFollowUs__twitter {
    border: 2px solid #e6e6e6;
    margin-top: 15px;
    padding: 12px 0;
}
.p-asideFollowUs__twitter__cont {
    text-align: center;
    font-size: 13px;
    color: #252525;
    font-weight: 700;
}
.p-asideFollowUs__twitter__item {
    display: inline-block;
    vertical-align: middle;
    margin: 0 2px;
}
/*記事がよかったら、いいねPC*/
.p-entry__push {
    margin-bottom: 20px;
    display: table;
    table-layout: fix;
    width: 100%;
    background-color: #2b2b2b;
    color: #fff;
}
.p-entry__pushThumb {
    display: table-cell;
    min-width: 240px;
    background-position: center;
background-size:cover;
}
.p-entry__pushLike {
    display: table-cell;
    padding: 20px;
    text-align: center;
    vertical-align: middle;
    line-height: 1.4;
    font-size: 20px;
}
.p-entry__pushButton {
    margin-top: 15px;
    display: inline-block;
    width: 200px;
    height: 40px;
    line-height: 40px;
    -webkit-transform: scale(1.2);
    -ms-transform: scale(1.2);
    transform: scale(1.2);
}
.p-entry__pushButtonLike {
    line-height: 1;
}
.p-entry__note {
    margin-top: 15px;
    font-size: 12px;
    color: #999;
}
.p-entry__tw-follow {
    margin-bottom: 10px;
    background: #f4f4f4;
    width: 100%;
    padding: 15px 0;
}
.p-entry__tw-follow__cont {
    text-align: center;
    font-size: 15px;
    color: #252525;
}
.p-entry__tw-follow__item {
    display: inline-block;
    vertical-align: middle;
    margin: 0 15px;
}
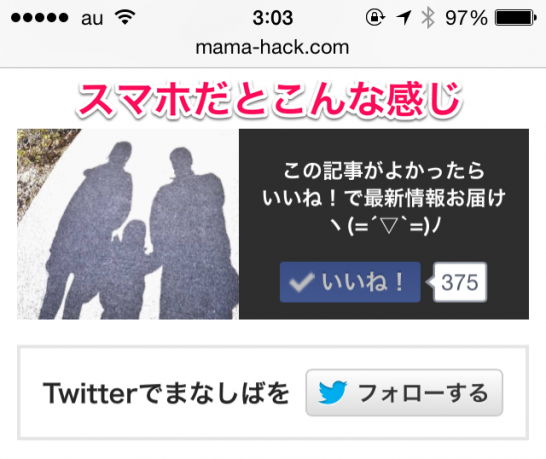
これでこんな感じのやつが今まで表示されていた場所に表示されるようになるはずです。
テーマをいじることになるので慎重にやりましょう。
他にSimplicityを使ったカスタマイズはこんなことをやってます。
Simplicityを使っていてメニューに複数カテゴリを表示する方法 すごく簡単にできる